| HTML Tutorial: | Introduction | HTML Basics | Hyperlinks | Images | Tables |
| On This Page: | How Image Tags Work | Size Attributes | Alt Tags | Spacing | Alignment | Borders |
The HTML Image Tag
The image tag is used to place an image on the web page. In its most simple form it looks like this:
<img src="image1.jpg">

The Basics - How it Works
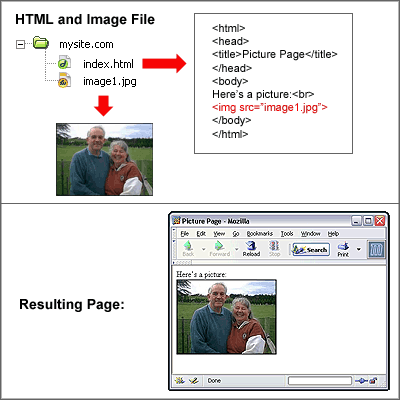
It is very important to understand that images are not technically "part" of the web page file, they are separate files which are inserted into the page when it is viewed by a browser. So a simple web page with one image is actually two files - the HTML file and the image file. The example on the right illustrates this.
In this example the two files are both located in the same folder. The HTML file includes an image tag which refers to image1.jpg.
When the HTML file is displayed in a browser, it requests the image file and places it on the page where the tag appears.
As you can see, the most important attribute of the image tag is src, which means source and tells the browser where the image file is.
Size Attributes
The size attributes define the width and height of the image. They look like this:
<img src="image.jpg" width="200" height="150">
These attributes are optional but strongly recommended as they help the browser arrange the page more quickly.
Resizing the Image
If the size attributes are set to different values than the original image size, the browser will resize the image to the specified size (this doesn't affect the image file itself, just the way it's displayed in the page). This is a bad idea - the browser will not do a very good job of resizing and there are other complications. In general you should always match the size attributes to the actual size of the image file. If you don't know the image file size, try either of these methods:
- Import the image into any graphics program and select "Image Size" from the menu. This will tell you the height and width.
- Open the image file in a browser, right-click the image, then select "Properties". This will tell you the width and height.
If the image file is the wrong size for your needs, you need to resize it properly using a graphics program. See How to Resize an Image.
Examples
The examples below show how the same 200x150 pixel image is displayed with different size attributes.
Alt & Title Tags
 These two tags are very similar and can be confusing. Basically, it makes sense to treat them as the same thing and use them both.
They define a short piece of text which appears instead of the image if the image cannot be displayed (for whatever reason), and/or as a "tool-tip" when you hold your mouse over the image.
If both attributes are specified, the title tag will override the alt tag. Hold your mouse over this image to see which tag your browser displays.
<img src="image.jpg" alt="Photo of Mr and Mrs Owen" title="Mr and Mrs Owen">
If no alt or title tag is specified, the results vary depending on the browser and user settings. Some will show nothing, some will show the file name.
Spacing Attributes
You can create space between the image and surrounding text by defining vertical and horizontal space like so:
<img src="image.jpg" vspace="5" hspace="10">
Alignment
You can use the align attribute to position the image:
<img src="image.jpg"align="left">
The following alignment options are available:
left, right, top, middle, bottom, absmiddle, absbottom, baseline, texttop
Note: These options are not particularly intuitive, that is, you may be surprised at how they actually function. We recommend that you experiment with these standard options and learn exactly how they work. Unfortunately image alignment is somewhat limited in standard HTML. For accurate placement you may need to use more advanced methods than we are covering here.
Border Size
The border attribute places a border around the image. In the following example a 1-pixel border is applied:
<img src="image.jpg" border="1">
If no border attribute is specified, no border is applied, except when the image is used as a hyperlink. In this case a 1-pixel border is applied. If you want to make an image into a hyperlink without a border, specify a zero border like so:
<img src="image.jpg" border="0">
Next Page: Tables