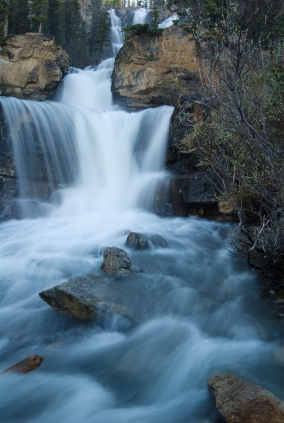
Photographing the Motion of Water

Photographs of the sea, lakes and rivers can be stunning, and pictures of sunrises and sunsets over water are particularly effective. Capturing the motion of water in a photograph is an effect few photographers area able to achieve. Fast shutter speeds freeze the motion of water, and the results can be disappointing. With a couple of basic pieces of equipment and the technical know-how you can capture dreamy water effects with a digital SLR camera. The following steps will result in images which will amaze your friends and family, and make you the envy of other photographers.
This effect works with pictures of lakes, rivers and the sea. This article will focus on the capturing the motion of the sea, but the techniques are easily adapted for other water features.
1) Safety first.
Take sensible precautions when working near the sea or other large areas of water.
Be aware that tides can change quickly, and pay attention to changing weather
conditions. Wear appropriate clothing and footwear, and pay particular attention if
moving around on rocks or other slippery surfaces. Be aware of your personal safety,
and look after your camera and equipment in these conditions.
2) Select the slowest shutter speed.
Taking a photograph of the sea in daylight will usually mean that the camera will
select a fast shutter speed. To capture the silky-smooth motion of the waves, a shutter
speed of ten seconds or more is required. Set the camera to the lowest ISO setting
possible. Set your digital SLR to manual or aperture priority mode, and select the
smallest possible aperture. The shutter speed required to expose the scene correctly
will now be considerably slower, but images will still be too sharp for the desired
effect.
3) Fit a neutral density filter.
A neutral density filter is the little piece of equipment which really makes the
difference when taking this type of shot. These filters are available in a range of
strengths, and each reduces the amount of light entering the camera’s lens. A variable
neutral density filter offers great flexibility, and saves you having to carry filters of
different strengths. If you choose a very strong neutral density filter, you may need to
frame the shot before fitting the filter as the viewfinder may appear black.
4) Fit the camera to a tripod.
A neutral density filter will reduce the shutter speed to anything between a couple
of seconds and a couple of minutes. To capture the motion of the sea and ensure that
the rest of the scene remains sharp, a tripod is essential. If you don’t have access to a
tripod, you may be able to improvise by resting the camera on a wall or other sturdy
base.
5) Set the camera to self-timer mode.
Pressing the shutter button may cause vibration in the camera which can ruin the shot.
To prevent the risk of camera shake, set the camera to self-timer mode.
6) Take lots of shots.
Once you have adjusted the camera settings as described and secured the camera to
a tripod, you are ready to begin shooting. If possible, frame the shot so that there is
some foreground interest such as rock formations or a pier. The long shutter speed
creates a misty effect as the water moves during exposure. Waves and movement of
the sea are unpredictable, so take the shot several times so that you have a number to
choose from. This type of shot works really well in black and white, so adjust your
camera and take some monochrome shots if it has the facility.