Video Camera Iris
 The iris is an adjustable opening (aperture), which controls the amount of light coming
through the lens (i.e. the "exposure"). The video camera iris works in basically
the same way as a still camera iris -- as you open the iris, more light comes in and the
picture appears brighter. The difference is that with video cameras, the picture in the
viewfinder changes brightness as the iris is adjusted. For this tutorial, we'll be setting
exposure by eye; that is, adjusting the iris until the exposure looks right in the
viewfinder (as opposed to using a light meter).
The iris is an adjustable opening (aperture), which controls the amount of light coming
through the lens (i.e. the "exposure"). The video camera iris works in basically
the same way as a still camera iris -- as you open the iris, more light comes in and the
picture appears brighter. The difference is that with video cameras, the picture in the
viewfinder changes brightness as the iris is adjusted. For this tutorial, we'll be setting
exposure by eye; that is, adjusting the iris until the exposure looks right in the
viewfinder (as opposed to using a light meter).
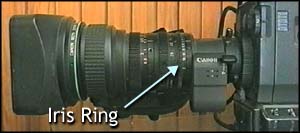
- Professional cameras have an iris ring on the lens housing, which you turn clockwise to close and anticlockwise to open.
- Consumer-level cameras usually use either a dial or a set of buttons. You will probably need to select manual iris from the menu (see your manual for details).
The Correct Exposure
Before using your manual iris, you need to know what the correct exposure looks like in your viewfinder (note: if your camera has the option to adjust viewfinder settings, you'll need to do that first). A good start is to set your camera on auto-iris and frame a shot with nice, even lighting. Notice how bright the picture is, then set the iris to manual. Most cameras will retain the same exposure as set by the auto-function, which you can adjust from there as you go. Open and close the iris, then try to set the exposure where it was before.
Always set your iris so that the subject appears correctly exposed. This may mean that other parts of the picture are too bright or too dark, but the subject is usually more important.
Professional cameras have an additional feature called zebra stripes which can help you to judge exposure.
Practice is the only way to get exposure right. Record a number of shots in different light conditions, then play them back and see how good your exposure was. Remember, if you're not sure about your exposure, try flicking the iris to auto and see what the camera thinks, then go back to manual. In time, you'll come to trust yourself more than the auto-iris.
Backlight
A common difficulty with exposure is what to do in uneven lighting situations. The "strong backlight" scenario is a headache -- this is where your subject is set against a much brighter background, as in the pictures below...
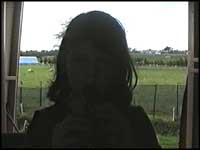
In the first example, the camera is set to auto-iris. The camera adjusts the exposure for the strong backlight, which leaves the subject as a silhouette. Some cameras have a "backlight" feature which helps with this problem, but it won't work as well as manual iris control.
Assuming that you can't change your framing or add more lighting to the subject, the only option is to open the iris until the subject is exposed correctly. This will mean the background is too bright, but it's better than the subject being too dark.

In the second example, the manual iris is opened until the subject is correctly exposed. Although this is still far from ideal exposure, it's an improvement on the silhouette effect.
In fact this situation is quite common—on television you'll often see an outside window which looks too bright, but you don't usually notice because you're watching the subject inside. (Note that there are ways around this if you have the time and budget.)
Remember, the rule of thumb for iris control is: Set your exposure for the subject. Everything else is secondary.