How to Edit with a Camera and VCR
This page shows you how to set up a very simple editing system without any extra equipment.
Note: Editing with a camera and VCR is essentially the same as editing with two VCRs, except that the camera will
act as the source VCR.
You will need:
- A camera with AV (audio and video) outputs, and the ability to playback tapes (most camcorders can do this).
- A VCR. If the VCR doesn't have AV inputs, you'll need to use the RF (aerial) input. This means that your camera must have an RF output (or adapter). An article explaining RF will be available soon.
- A video monitor (or television).
- Connecting leads. For mono editing, you'll
need one video and one audio lead for each connection. For stereo editing, you'll need one
video and two audio leads for each connection. If you're using RF, one lead carries both
video and audio for each connection.
In the diagram below, each connection is shown as a single black line with an arrow in the direction of signal flow.
Connect your equipment as shown in the diagram.
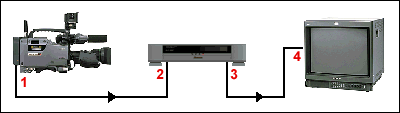
(1) AV output of the camera plugs into (2) AV input of the VCR.
(3) AV output of the VCR plugs into (4) AV input of the monitor.
The camera will be the "source" machine, and the VCR will be the
"record" machine. This means that you will be using the camera as a playback
VCR, and recording a new (edited) version of the tape in the VCR.
Select the appropriate "AV input"
on both the VCR and monitor.
If you play a tape from the VCR, you should see and hear it on the monitor.
If you stop the tape in the VCR and play a tape from the camera, you should see and hear
the camera's tape on the monitor.
Put the tape to be edited (your "source footage") in the camera. Put a new, blank tape in the VCR (see also how to prepare a tape for recording).
This is where the editing process begins. There are three types of editing which can be done on consumer VCRs: "Assemble", "insert" and "audio dub". Assemble edits can be done on any VCR, but insert and audio dubbing are only available on VCRs which support these functions - see your manual for details. Assemble editing should be adequate for most home video purposes.
Assemble editing
- Using the VCR's jog/shuttle or other controls, locate the point at which you want the edit to begin. Put the VCR in pause/record mode.
- If necessary, put the camera in playback mode so that you can play the tape. Using the camera's playback controls, locate the point at which you want the edit to begin. Put the camera in pause mode.
- Release both machines from pause mode
(usually by pressing the pause buttons). This will cause the camera to play and the VCR to
commence recording.
Note: There will be a delay on each machine from when you release the pause mode, to when they begin playback/record. You may also find that the VCR doesn't begin recording exactly where you thought it would. You'll need to experiment to find out the exact delay characteristics of your machines. Typically, you might need to pause the VCR a little before or after the desired edit point, and pause the camera a few seconds before the edit point. - Stop both machines when you get to the end of the edit.
- Repeat steps 1 to 4 for each edit.
Insert editing (video insert)
Insert editing means recording new pictures in the middle of existing pictures. You will need a VCR with this function - it's usually only available in more expensive models. You will need to consult your operating manual for specific instructions.
Audio dubbing (audio insert)
Audio dubbing means inserting new audio over existing video. This can be used, for example, to add music or commentary. Again, you will need to consult your operating manual for instructions.