Adobe Premiere Dynamics Effect
The dynamics effect can be found in the effects window, under Audio Effects > Stereo > Dynamics or Audio Effects > 5.1 > Dynamics. To apply this effect, select the appropriate clip in the timeline and drag the effect onto the clip (or drag the effect into the Effect Controls window).
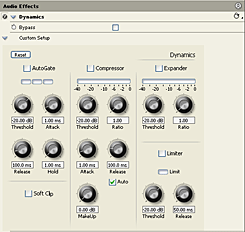 Once the effect has been applied, expand it in the Effect Controls window. You will notice there are two ways to adjust the settings: Custom Setup and Individual Parameters.
If you are new to this type of effect, or if you are used to using dynamics hardware (compressors etc), then you will probably find the custom setup option easiest. It uses familiar knobs to set parameters such as threshold and ratio.
The dynamics effect is roughly divided into the following types:
- Noise Gate
- Compressor
- Expander
- Limiter
 Each of these effects is a topic in itself. For more information about what they mean, see our audio processing tutorials.
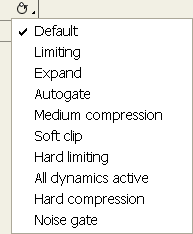
Note: Click the reset button on the right side of the Effect Controls window to show a flyout menu with a number of preset options (pictured right). These are great for setting up common effects such as limiter, medium compression, etc. You can adjust the parameters to fine-tune the preset effects.
Example
The dynamics effect is a good way to fix problems with audio levels that vary too much. For example, if you have several people speaking and some of them are much quieter than others, it can be difficult and time-consuming to manually adjust the levels. Instead you can use this approach:
- Lift the overall gain of the clip (or track) to a point where the quiet parts are loud enough.
- The loudest parts will now be too loud, so add the dynamics effect.
- Check the compression option and adjust the threshold and ratio until the louder parts are acceptable.
- You may also need to enable the limiter option to safeguard against clipping.