Opacity in Adobe Premiere Pro
This page shows you how to adjust the video opacity settings in Adobe Premiere to create various transparency and overlay effects.
Notes:
- This page shows how to set the opacity uniformly for a whole clip. The next page will show how to change opacity over time.
- If you want to create a simple fade between clips or to black, a Cross Dissolve transition is easier than adjusting the opacity.
Setting the Opacity of a Clip
Every video track in a Premiere project has an opacity setting. By default this is 100%, i.e. completely opaque (visible). As you reduce the opacity of a track, it becomes more transparent and the track below becomes more visible. If there is no underlying track, the black background becomes visible.
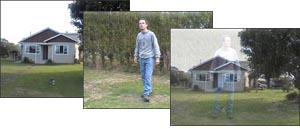
The example below uses two video clips — a shot of a house and a shot of a person (Dave). The "House" clip is on Video Track 1 and the "Dave" clip is on Video Track 2:
At this stage both tracks are 100% opaque, so you only see the top one (Dave). We need to reduce Dave's opacity to see the house underneath. There are two ways to do this:
- Use the Effects Controls panel in the monitor window.
- Use the opacity handles in the timeline window.
(1) The Effects Control Window
- Select the "Dave" clip in the Timeline window.
- Select the Effects Controls tab in the Monitor window.
- Click the triangle next to the Opacity property to expand it.
- Either click the opacity value and enter a new value, or drag the slider.
(2) Opacity Handles
- In the timeline, expand the Video 2 track view if necessary (click the triangle next to the track name so it points down).
- Click the Show Keyframes button
 , then choose Show Opacity Handles from the fly-out menu. A yellow line will appear on the clip indicating the opacity level.
 - Select the Pen tool
 and drag the yellow line up or down to increase or reduce opacity.
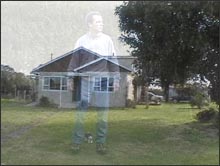
The example on the right shows the opacity set to 30%.
Remember, at this stage the opacity is a constant 30% for the duration of the clip. If you want the opacity to change during the clip, proceed to the next page...
Next Page: Changing opacity over time