How to Make a Video GIF

This page shows you how to make a short video clip into a GIF file for convenient sharing and distribution on the Internet. For this example we will create a GIF of the famous "Captain Picard Facepalm" (pictured right), but you can use any video clip you like.
Tools used in this tutorial:
- Photoshop (or similar program that supports video-to-layer import).
- Video editing application (optional but highly recommended—we use Premiere Pro).
Before you start, some important notes about using the GIF format for videos:
- GIFs are limited to 256 colors, so the quality isn't as good as other formats.
- The file size is relatively large. You may need to reduce the quality more than you'd like to make it a usable size.
- Animated GIFs tend to load slowly. As a GIF initially loads in a web page the video will often stutter which can spoil the viewer's first impression. For a looping GIF, once it has loaded the first time it will then begin playing smoothly.
- You cannot include audio with GIF files.
- You can choose to have the video play only once, automatically repeat a set number of times, or repeat endlessly. For our example we'll use an endlessly repeating video.
Step 1: Prepare the video clip
You will need a short video clip to begin with—generally speaking the video should be no more than a few seconds. If it's more than about five seconds, the file size and loading time start to become unacceptable.
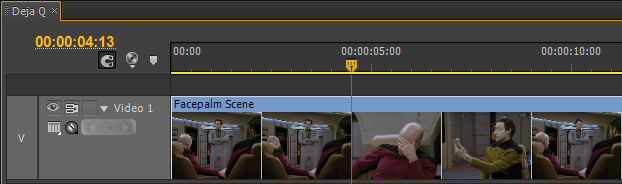
Ideally, at this stage you should trim the video clip so you have only the frames you want and nothing else. You can do this in a video editing application such as Adobe Premiere. If you don't have access to a video editor or you don't know how to edit video, it is possible do it in the next step instead. In the example below, the scene is loaded into the editing timeline, cut at the beginning and end of the relevant shot, and the rest is discarded. (Note: There are more efficient ways to trim a clip but this is a nice simple way to demonstrate the process.)
Bonus Tip: Seamless looping
In most repeating GIFs, when the clip reaches the end there is a jump-cut back to the start. However in some cases you can make the last and first frames work together to create a seamless never-ending loop. Unfortunately there are only a couple of scenarios in which this can work. Here are a couple of options to try:
- Edit your video so the first and last frames are so similar it looks "close enough" to seamless. This is rarely possible—you'd have to be lucky or plan the clip specifically for this purpose.
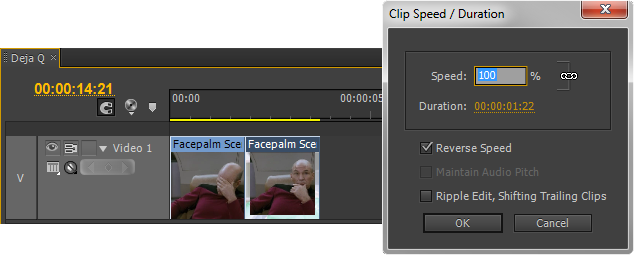
- Create a forward-reverse loop. This only works in cases where the video looks okay in reverse speed, but it's surprising how often this is true. I've used this method for the facepalm clip. The trick is to create a copy of the original clip, place it immediately after the original clip on the timeline, then reverse the speed of the copy. Both clips together make up the new looped version of your clip. Note that this doubles the size of the clip.
Export Video
Whatever method and software you use to create the video clip, export/save it to a video file in any common format. An uncompressed format is preferable. At this stage you can choose to make the pixel size the same as the final GIF, but I prefer to keep the video size at the maximum and resize down to the final version later (I always like to keep a max-quality master).
Step 2: Import into Photoshop
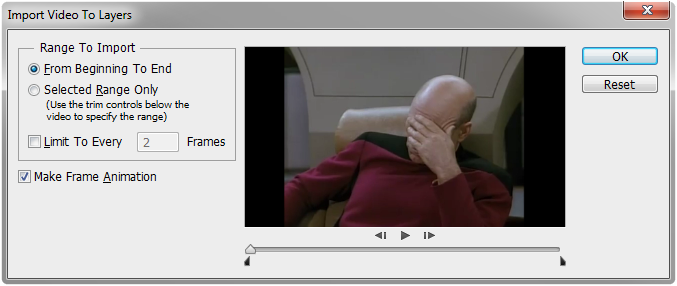
Open Photoshop and select File > Import > Video Frames to Layers. You'll see a window like the one below. Ensure that Make Frame Animation is checked. You can choose to trim the video to a selected range but this won't be necessary if you did it in the previous step.
Click OK. The video will be imported as a series of layers (each video frame becomes a Photoshop layer). If you don't understand Photoshop layers it doesn't really matter but if you'd like to learn about this feature, see our Photoshop layers tutorial.
To preview the animation, make the Timeline panel visible (Window > Timeline). You'll see all the layers presented as frames, with video playback buttons.
Bonus Tip: Add a watermark
You can add an extra layer to the Photoshop image containing a watermark, logo, etc. Make this the very top layer. It will be displayed on every frame of the animation.
Step 3: Save as a GIF
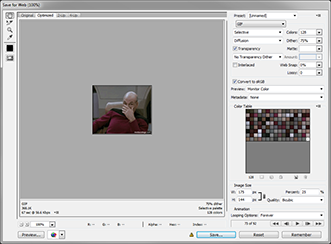
Select File > Save For Web. You'll see a window like the one pictured, containing various options for optimizing the image and reducing the file size. Pay attention to the following options:
- Colors: By default this will be 256 colors, and ideally you should leave it at this setting as it's already quite low for video. However it's also where you can save a lot of file size, so it's worth trying it on 128 (that's what I did for this example). Note that the larger the image's pixel size, the more noticeable reducing the colors will be.
- Dither: Higher means better quality, lower means reduced file size.
- Lossy: Lower means better quality, higher means reduced file size.
- Image Size: You'll almost certainly want to reduce this.
When you're happy with the settings, click Save. Done!
Questions and comments welcome in the forum.