Create a Custom Fill Pattern in Photoshop
This tutorial shows you how to create a custom fill pattern. Follow the steps below, or download the video tutorial for a detailed demonstration (see link on right).
- Create a new file (File > New).
- Set the width and height to the same dimensions as your desired pattern.
- Create your desired pattern.
- Select Edit > Define Pattern.
- Enter a name for the pattern, then click OK.
- Close the file.
- To test the new pattern, create a new file.
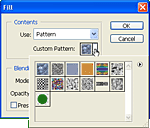
- Select Edit > Fill.
- Click the Use drop-menu.
- Select Pattern.
- Click the Custom Pattern drop-menu.
- Your new pattern should be visible in the collection of patterns. Click to select it, then click OK.
- The image is filled with your pattern. Done!
Note: To delete unwanted patterns, right-click the pattern in the Custom Fill box, then select Delete.