Time Remapping in Adobe Premiere
Time remapping is a new feature introduced in Adobe Premiere Pro CS3. This is a significant improvement for those wanting to create time-based effects such as slow motion and variable speed.
To begin:
- Place a video clip in the timeline
- Click the Clip Effect menu (to the right of the clip name).
- Select Time Remapping > Speed
As illustrated below, the clip view is divided into three areas: The white speed control tack at the top, the light green area representing speeds higher than 100%, and the darker green area representing less than 100%. The line at 100% is a rubber band that can be dragged up and down.

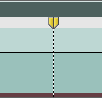 Ctrl-click (Win) or Cmd-click (Mac) at any point on the rubber band. A speed keyframe is created, identified by a dotted line and a pair of handles in the speed control tack.
You can now drag the rubber band on either side of the keyframe to increase or decrease the speed (the speed on the other side remains the same).
Note: The duration of the clip will automatically adjust to accommodate the new speed(s). If there is no available space to the right of the clip, and the speed is reduced, the clip duration will stay the same and be truncated.
Add more keyframes to create more changes in speed.
Note: To create a nice smooth transition between different speeds, see Premiere Time Remapping Transitions.