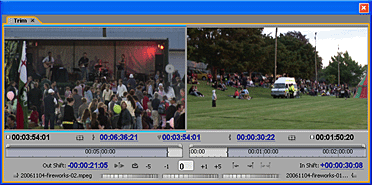
Adobe Premiere Trim Monitor
 The trim monitor looks similar to the source and program monitors — the difference is that it includes a specialized set of controls to fine-tune the edit between two shots. It doesn't actually do anything that can't be done with the timeline, source and program monitors, but it can make this type of adjustment easier.
The left image view shows the last frame of the first (outgoing) clip. The right view shows the first frame of the second (incoming) clip. The controls allow you to add or remove frames from each clip and preview the transition.
To open the trim panel, move the CTI to the edit point in the timeline and use one of these options:
 Click the trim button below the program monitor (pictured right)
- Click the panel menu button on the program monitor, then select Trim
- Keyboard shortcut: Ctrl-T
There are various ways to trim frames using different controls in the trim monitor...
Image Views
Hold your mouse over one of the image views. The cursor will change to the trim-in or trim-out icon. Click the view to make it active — a cyan bar will appear above and below the image. Drag left and right to add/remove frames in a ripple edit.
If you click and drag in the middle of the two monitors the cursor changes to a rolling edit icon and both monitors become active. Drag to perform a rolling edit.
Timecode Displays
There are five timecode displays below the image views. The outer displays (in black) show the duration of each clip. The centre three displays (in blue) can be dragged to perform edits.
The left display adjusts the outpoint of the first clip, the right display adjusts the in-point of the second clip (both as a ripple edit). The centre display adjusts both points in a rolling edit.
Time Rulers
Click and drag the ingoing/outgoing point handles in the time ruler below each monitor.
Shift Displays
Click and drag the Out Shift and In Shift displays to a perform ripple edit on the left or right view.
Click the - and + buttons to a perform ripple edit on the active view. You can also enter a positive or negative number in the box.
Jog Disks
Use the jog controls at the bottom of the panel. The left and right disks perform ripple edits, the middle jog performs a rolling edit.
Keyboard Shortcuts
| Ctrl + t | Open trim panel |
| Alt + 1 | Focus on both Outgoing and Incoming sides |
| Alt + 3 | Focus on Incoming side |
| Alt + 2 | Focus on Outgoing side |
| Alt + Shift + Left Arrow | Trim backward by large trim offset |
| Alt + Left Arrow | Trim backward by one frame |
| Alt + Shift + Right Arrow | Trim forward by large trim offset |
| Alt + Right Arrow | Trim forward by one frame |