Microsoft Word: Editing Your Document
Moving Around Using the Arrow Keys or Mouse
You may move your cursor to the right, the left, and up or down by using the Arrow keys.
You may move the cursor around by moving the mouse pointer to the place you have in mind and clicking the mouse.
If you have not done a lot of typing and don’t have extensive experience with the mouse, you may find the arrows to be the easiest method of moving around. Once you have conquered the mouse, you will only occasionally use the arrow keys.
Note: You cannot have the cursor past the end of the document using either the Arrows or the mouse.
Deleting Characters or Words
There are a number of ways to delete characters or words. We will explore many of them. You should be aware that you will develop preferences for getting your work done that may be different from your neighbor. MS Word is a very flexible application and there are many ways to get the same job done.
You may Delete characters moving to the right using the Delete key, or Delete words moving to the right by typing CTRL Delete.
You can delete characters moving to the left by using the Backspace key (back-arrow), or Delete words moving to the left by pressing CTRL Backspace.
You may delete characters or words by selecting them by highlighting them with the mouse and then using the Delete key.
You can delete characters or words by selecting them by highlighting them with the mouse and then click the Edit button on the Menu Bar and then clicking Clear (delete).
Exercise
Experiment by moving your cursor around the paragraph using the arrows. Move the cursor around using the mouse pointer and click to select a new location.
· Move the cursor to the beginning of the first center, the cursor will be blinking.
· Use the Delete key to delete the first center, one character at a time, moving to the right.. Use CTRL Delete (hold down the CTRL and then press the Delete key). To delete the next center as an entire word.
· Move the cursor to the end of the last center. Use the backspace key to delete the last center one character at a time moving to the left.
· Use CTRL Backspace to delete the previous center as an entire word. You should have three centers left.
· Now select one of the centers and highlight it by moving the mouse pointer to the beginning or end of the word and, while keeping the left (primary) button depressed, highlight it by moving across the word. If this is difficult, you can also use the SHIFT key and the Arrow key (from the right or left) to highlight. With center highlighted, press the Delete key. This is especially useful when you want to delete several words or a sentence or more.
· You can also “double click” a word to highlight it. “triple clicking” will highlight a larger area, usually the paragraph.
You should now be down to just one center in the sentence.
Undo and Redo or Repeat Buttons
Don’t panic if you touch a wrong key, or do something that seems to change everything from the way you want it.. There is an Undo Key and a Redo key.
The Undo and Redo keys are found on the Formatting Toolbar. They are represented by curved arrows. Undo is on the left and curves backwards, and Redo or Repeat is on the right.
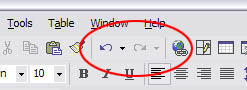
Click the Undo button. The last center that you deleted should reappear unless you have done some other command since then. Click Redo and it will be gone again.
Undo and Redo are also on the Edit Menu. Click on Edit and the first two buttons are Undo and Repeat (or Undo). Redo is grayed out meaning it is unavailable until you have hit the Undo key.
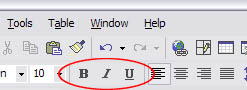
Bold, Italics, and Underline
These keys are found on the Formatting Toolbar and can easily dress up your document and make it appear more professional. They are represented by the B, I, and U.
Exercise
Using our paragraph, let’s practice using these formatting tools. Highlight the center’s name and then click on B for Bold. Highlight the information in the parentheses and click on I for Italics. Highlight ‘meet old and new friends’ and click on the U for Underline. Your paragraph should now look something like this:
The Golden Hour Senior Citizen’s center (that’s right, seven centers) is a great place to relax, meet old and new friends, and get training on computers and word processing.
Font Size and Fonts
Changing the size of words in your document is one of the best ways to call attention to specific parts or provide a title or sections.
You can change the size of the whole document, or just a word, or just a character. My paragraph above is in 12-point size. We will increase the size to 14. Select and highlight the entire paragraph using your mouse.
With the paragraph selected, click on the point that is probably a 10 or 12. The standard text in documents varies between 9 and 12. For effect, we’ll select 14.
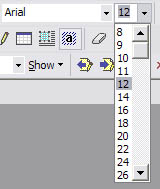
Click on the down arrow to the right of the point size. The matching size in the drop down menu is highlighted. Either select 14 by moving the mouse pointer to 14, or type 14 when the number in the box is highlighted. Your standard choices are 8 through 72 but you can enter any number between 1 and 99.
Let’s decrease the size of the words within the parentheses to 8 point. Select the words within the parenthesis by going to the beginning or end of the phrase, clicking with the mouse and then going across the words to select them all. Then click on the down arrow to the right of the 14 and select the number 8. The text within the parentheses will now appear smaller than the rest.
Next page: View & Zoom