Wedding Photography Quick-Start Guide
Wedding Photographer for a Day
You were looking forward to being a guest at your friends’ wedding and they pop the question ‘Will you take the photographs?’ Do you politely decline or rise to the challenge? This article is for the bold amateur photographer and hobbyist who says ‘yes’ to being official wedding photographer for the day. It will prepare you both mentally and practically for this challenge.
Expectations
You have agreed to do the job and the heat is now on, but don’t panic. The expectations you imagine the wedding couple have may make you uncomfortable but they are probably lower than you can competently fulfil. Success depends on keeping calm and making adequate preparations. The first thing to do is to obtain as much information as you can at an early stage.
Early information
Involve yourself with the wedding plans from the beginning. Find out where the wedding ceremony and reception will take place, and when. Assess the degree of formality of the occasion and what the couple want. If they are aiming for a relaxed and casual atmosphere, they will probably want this reflected in the photographs.
Ask the couple which photographs they want you to take, and of whom specifically. Make it a two-way exchange by sharing ideas of your own. Come away with a list of groupings of relatives and friends, and make a note of individual names and their relationship with the bridal couple. Add to the list the bride and groom, individually and together.
Find out in what form the couple would like to receive your photographs. Do they want a traditional wedding album of prints? Or do they wish to have the images on a disk? A popular idea is to have a photobook printed. Ascertain exactly what your remit is and how far your services go.
Preparation
Having obtained a clear idea of what is wanted, you are free to make your own preparations. If you know the principles of photography but feel you could do with more experience of taking pictures of people, co-opt family members and friends into being subjects for you to practice on. Photograph them indoors and outside, seated and standing. This provides practice in giving instructions to people, putting them at their ease and posing them.
Do go and have a look at the wedding venue and familiarise yourself with it. Talk to someone in authority about what is allowed during the ceremony. It may not be possible to use flash. Try to go at the same time of day as the wedding and take someone with you to pose for some test shots. This will alert you to any particular issues you need to take into account.
See if there is a suitable setting for photographs outside the place where the bride and groom will be married. Note the direction of the light and where would be best to place the couple and groups. Assess whether you will need a stool or steps to stand on. If the area outside the wedding venue is not very photogenic scout round nearby for something better. Alternatively, if the reception is elsewhere, this may provide better opportunities.
If the weather is likely to be hot, look for sources of gentle shade. It is also wise to form an alternative plan if rain or snow is a possibility. This may involve porches, umbrellas, and some creative thinking to make bad weather into a unique and interesting feature.
Preparations such as these are the foundation of success and they build confidence which will help you to relax more on the day. However, there is always the unexpected for which you cannot plan. You will need to be flexible on the day, responsive to any unique or novel situations as they arise and be ready with your camera at all times.
Equipment
Don’t rush out to buy a new camera or extra equipment. In most cases you are better off using what is completely familiar to you. By all means further develop your knowledge and photographic skills in the time before the wedding, but try not to introduce new hardware.
Make sure that you have everything to hand the night before. Have all your batteries charged and ready. Take as many memory cards as you have, ready formatted, or rolls of film. Pack flash equipment, lens cleaning accoutrements and a tripod. A white card can be useful for custom white balance. If you have a spare camera take that as well.
Do not forget your list of photographs to be taken, including the names of relatives and friends.
Tips
Having someone with you to act as an assistant photographer can greatly reduce the stress of trying to be everywhere at once. Casual shots taken with a point and shoot camera increase the coverage of the event, and the second viewpoint can provide richness, variety and interest.
Take many photographs at every stage so you will have plenty to choose from. You never know when someone has blinked at the crucial moment. If you are using a digital camera, review your pictures now and again to check your exposure settings. As well as the main subjects, remember to photograph details such as the bridal bouquet, hands and rings, dress detail and floral arrangements.
Watch out for unwanted elements such as litter or a post apparently growing out of the groom’s head. Take action so these do not appear in the photograph. Avoid positioning people where they screw their eyes up against the sun. Use fill-in flash to soften facial shadows caused by bright sunlight, and to lighten an image that is back-lit.
Photographs of the bride need to capture not only her radiance, but the beauty of her dress also. Care must be taken when it is a light colour, especially white. Metering off the dress will ensure it is accurately represented, but if the groom is wearing dark colours, these will appear even darker unless you compensate for this with positive EV.
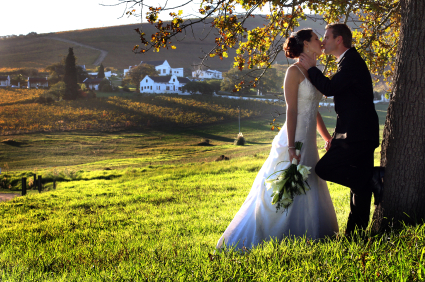
The space between the couple will appear greater in the photograph than it actually is. Encourage the bride and groom to turn their bodies slightly in towards each other and incline their heads towards one another whilst looking at the camera or at each other.
You will want to compose many of your shots of the bride and groom to include their heads and feet. This can result in a surfeit of pictures with a strong vertical element. To create variety take some more intimate head-and-shoulders shots. It is also fine to frame the couple without including their lower legs, but do not cut them off exactly at the knees.
By taking a photograph of the bride and groom in the landscape orientation you may be able to include some detail of the surroundings. An architectural feature or some foliage can add visual interest. It may also be possible to vary the relative heights of the couple by having one, usually the bride, sitting down. This makes for an attractive composition.
Even when the bride and groom ask you to take a really casual approach with informal groups, don’t just snap away expecting people to make a naturally harmonious arrangement or adopt attractive poses. There will still be a need for you to take charge, pose people and compose the shot, albeit casually, or the results will be untidy and disappointing.
Issues
There are some key issues which tend to arise in wedding photography. Low light levels indoors is perhaps the main one. If you are not able to use flash or do not want to use it, a higher ISO setting will enable a faster shutter speed, but it will also create more noise.
Setting the white balance is important, particularly with reference to the white dress, and in artificial light situations. If possible set a custom white balance on your camera. This is usually superior to a preset. You can use the white card you have brought with you to do this.
Flash can produce cold and harsh results but it may be the only option in some circumstances. Various devices can be used to diffuse the light e.g. by bouncing off the ceiling, and so avoid harsh shadows.
When the wedding is over
You may be relieved when the event is over and you have hundreds of photographs safely captured, but the real work lies ahead of you.
The mass of photos needs to be organised and possibly processed. It helps to put them in several folders entitled ‘before’, ’during’ and ‘after the ceremony’, and ‘at the reception’. Each can have sub-folders to further reduce the number of images you have to view at one time. This makes it easier to select the best pictures in any category and helps you find things easily too.
Post-processing
If you are using a digital camera it is useful if you have some knowledge and experience of post-processing. Even the best of your images may benefit from a little tweaking. Using basic photo-manipulation software you can crop, adjust brightness and contrast and correct red-eye. With more elaborate applications you can reduce image noise and you may even be able to paint in your own confetti!
Having post-processing resources at hand is a comfort but do not rely on it to rescue a bad picture. Any corrections should be moderate and unnoticeable. Sharpening in particular needs to be used with great care.
Happy ending
You heave the last sigh of satisfaction as you present the newly married couple with their album, disk or photobook and watch their delight, which is a picture in itself. Now you can bask in the glory of success and the compliments you receive. Follow these tips and pointers and this wonderful experience can be yours. You never know – it may also be the start of a new career.