How to split a clip, then apply a transition
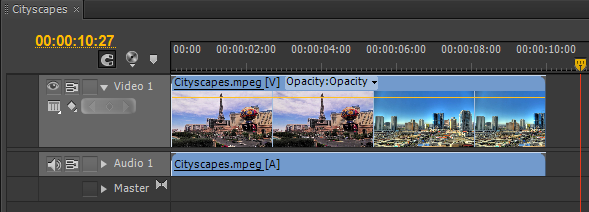
In this tutorial we will take a single video clip consisting of two or more shots, split the clip into the individual shots and apply a transition between them. We'll use a cross dissolve but the same instructions apply to any transition. Our example begins with a single clip on the timeline consisting of two shots of city scenes:
Step 1: Split the clip
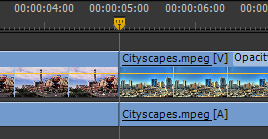
Make a cut in the clip at the first frame of the second shot. You can do this with the razor tool or by placing the current time indicator at the cut point and then pressing CTL-K (CMD-K on the Mac). This creates two separate clips like so:
You might think that you can now go ahead and apply the transition, but if you do you'll notice that it doesn't work. That's because there's another step to complete first...
Step 2: Create Handles
In order for the transition to work you'll need "handles" at the start and end of each clip. We'll explain this in more detail below but first here's how to do it:
You will need to shorten each clip—for the first clip you'll take some frames off the end, for the second clip you'll take some frames off the beginning. You can do this by clicking and dragging the ends of the clips. (Note: Shortening clips is necessary to create a proper transition but there are some possible workarounds if you really don't want to shorten them—see below.)
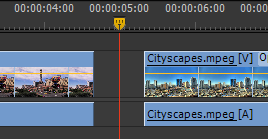
Decide how long you want the transition to be, then shorten the end of the first clip by half that amount. Shorten the start of the second clip by the same amount. In our example we want a 20-frame transition, so we take 10 frames off the end of the first clip and 10 frames off the start of the second clip, like so:
Close the gap between the clips (drag the second clip to the left or click the empty space and hit the Delete key).
Note: There are faster ways to do this whole process (e.g. the Ripple Delete tool) but this is the simplest way to show it visually.
Step 3: Apply the transition
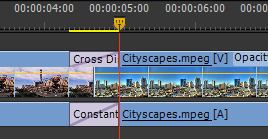
Now you can add the transition and it will work. Done!
How does this work?
The transition is where both clips overlap. Each shot must have enough frames to fill the entire duration of the transition. The second clip must start right at the beginning of the transition, while the first clip must continue right to the end of the transition. In the timeline image above you'll see the first clip needs more frames after the edit point to reach the end of the transition, and the second clip needs more frames before the edit point. The frames required by each clip to fill the transition are called handles.
Remember, each frame of the transition is a blend of one frame from the first clip and one frame from the second clip. At the start of the transition it's mostly the first clip and by the end of the transition it's mostly the second clip, but every frame must be able to blend one frame from each clip. If you have a shot that stops or starts halfway through the transition, the blending can't be done. That's what would happen in the example above if you didn't shorten the clips to allow for longer handles.
For more information see handles and transitions.
What if I can't shorten a clip?
You have a few options:
- Use a different transition. Some transitions don't blend frames from each clip, e.g. dip to black (or white).
- You could create a still frame from the first and/or last frame of each clip, then extend that across the duration of the clip. In most cases this won't work particularly well as it will be noticeable, but it might work if the shot is quite static or if you can make it seems as if it was intended.
- Slow down the duration of the clip at the start and/or finish, to give you more time for the transition. This will be tricky and it may not work very well, but it could be worth a shot.
If you have any questions please refer to this forum thread.