Premiere Pro Multi-Camera
Premiere Pro has a built-in system for dealing with multi-camera shoots, i.e. multiple camera angles of the same action. This is especially useful for situations such as live event coverage when you have several cameras showing different shots of the action, crowd, cutaways, etc.
The heart of the multi-camera system is the multi-camera source sequence. This provides a way to view all camera angles at the same time and switch between them (kind of like doing a live camera mix). Although it can take a little while to learn how to set up and use the multi-camera source sequence, once you've done it you'll probably find it much more efficient than trying to edit using a standard timeline.
Step 1: Set the Sync Points
The first thing to do is organize your camera angle clips and set a common sync point for each of them. This is a point at which all the camera clips are at exactly the same moment in time, so they will be in sync with each other. There are several ways to do this:
- Use a timecode reference. Timecode is typically recorded in the camera although it can be added later.
- Use in points or out points.
- Use clip markers (markers that you add to the clips in Premiere Pro).
- Use the audio tracks.
 For this tutorial we'll use clip markers, as it's an easy method that can always be used. Open each of your camera clips and find a good place to synchronize them. This will likely be an obvious visual or audio reference that can easily be seen or heard in all clips. The best-known reference is a clapper board which provides both a visual and an audio point. You can also just clap your hands to achieve the same effect. If you don't have such a reference point, look for something like a clear sudden movement or sound that appears in all clips. Add a clip marker to this point in each clip.
Step 2: Create a Multi-Camera Source Sequence
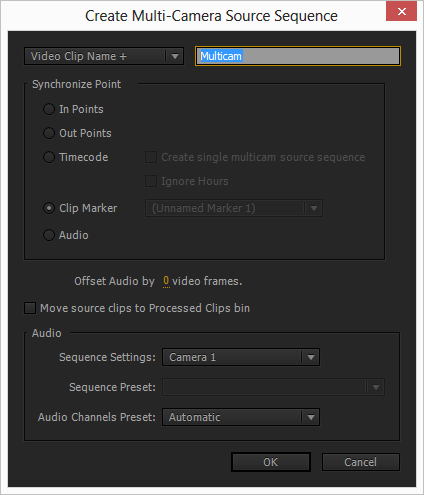
Select all the clips in your project panel (Ctrl-click to select multiple clips). Right-click one of them and select Create Multi-Camera Source Sequence. This brings up a dialog box that allows you to select the sync method. In our case we'll use Clip Marker.
Notes:
- If the Clip Marker option is not available, it means that one or more of the selected clips do not have a marker.
- In our case we've used a single unnamed marker in each clip. If you prefer, you could add a more descriptive name for your markers to make sure you use the correct one, e.g. "sync point".
 Click OK. This creates a new multicam sequence in the project panel that looks similar to a normal timeline sequence (pictured right). Importantly, although it looks similar to a normal timeline, it behaves quite differently. Let's see how...
- When you double-click a multi-camera source sequence it opens in the source monitor instead of the timeline.
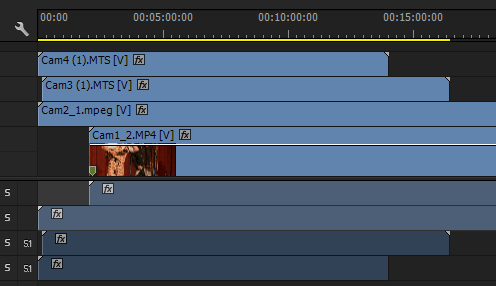
- To open it in a timeline instead, right-click the sequence in the project panel and select Open in Timeline. This opens it in a timeline with all the original clips overlaid on separate tracks as pictured below. Notice how they all all adjusted in the timeline to be in sync. In this example some of the cameras began recording later (so are missing the first part) or finished earlier (so are missing the last part). If you have multiple clips for the same camera, you can manually add them to the appropriate track.
This timeline view is useful for certain tasks such as applying effects to a particular camera view. However it is not how you will be editing the final product. For that we need to use the multi-camera monitor and/or embed this sequence in another timeline. This may seem confusing and unnecessarily complex, but it does actually make sense and in the end it gives you much more control and flexibility. Stick with it!
Step 3: Load and Begin Editing the Sequence
There are several ways to load and edit the multi-camera sequence:
- Double-click the sequence in the project panel to open it in the source monitor. You can make simple edits here but you cannot switch between cameras. Other than setting in and out points, this isn't much use.
- Create a new (normal) sequence and place the multi-camera source sequence in it. The quickest way to do this is to right-click the multi-camera source sequence in the project panel and select New Sequence From Clip. From here you can edit the timeline directly but in most cases (at least to begin with) you will use the next option to edit this timeline sequence...
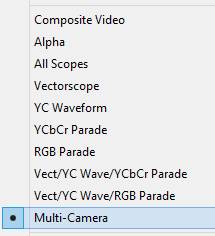
- In the program monitor's flyout menu, select Multi-Camera (pictured right). This changes the normal program view to multi-camera view and shows all the camera angles contained in the multi-camera source sequence. The screenshot below shows two panels in this scenario: The program monitor in multi-camera mode and the nested sequence in a timeline below (the green color indicates that it's a nested multi-camera source sequence).
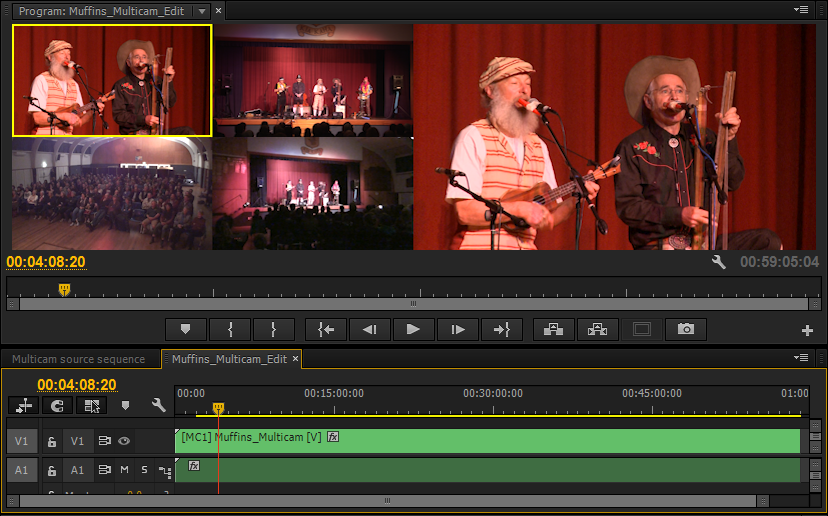
What's happening here? The program monitor is split into two halves—the left half shows the individual camera clips while the right half shows the output. In this screenshot camera 1 is selected (it has a yellow border and is in the output view). To switch between cameras, play the sequence and click the desired camera angle. The new camera angle will be selected with a red border and appear in the output view. When you stop playback you'll see cuts in the timeline where you changed cameras.
If you've got this far you've done the hard part. From here on it's all about tweaking. If you're struggling to understand how it all works, don't worry because a lot of people do at first. keep practicing and experimenting to see how different actions affect the finished output.
Step 4: Cleaning Up and Tweaking
In theory, once you've set up your sequences you can perform the entire edit in real time by playing the sequence and switching cameras as you watch. However it's unlikely that you'll get a perfect result so you'll probably want to do some fine-tuning when you've finished your first pass. Fortunately you can edit the timeline just like any other timeline. Typically you'll want to:
- Select the rolling edit tool and move cuts left or right.
- Add transitions such as dissolves. Note that transitions may not be shown in multi-camera view—if you add a transition but it doesn't seem to work, take the program monitor back to composite view.
- Adjust audio levels etc.
- Remember, to apply any effect to a particular camera view, go back to the source sequence (pictured in step 2 above) so you can work with the original camera clips rather than having to apply effects to every single edited segment.
More Notes
There are numerous keyboard shortcuts associated with multicamera work. See Edit > Keyboard Shortcuts...
In the timeline you can change the camera view withe the right-click menu. Select Multi-Camera and then the name of the camera.
In most cases you will want to use one audio track for the whole edit. Alternatively you can switch the audio along with the camera video. To do this, right-click the multi-camera view in the program monitor and select Multi-Camera Audio Follows Video. If you're using a single audio track and you ever forget which one is being used, have a look in the timeline to see which one isn't muted.
And Finally...
Multi-camera sequences aren't necessarily the best choice in all cases. There is a trade-off between the hassle of setting them up versus the speed and usability gains once they're set up. Sometimes if you have a short and simple job, it may be quicker to edit using traditional timeline techniques. Once you've worked with multicam sequences for a while you'll get to know if it's worth using them or not for any given job.