Shooting Technique
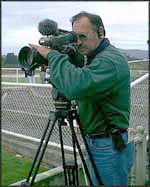
Position yourself and your camera.
If you're using a tripod, make sure it's stable and level (unless you have a reason for it to be
tilted). If the tripod has a spirit level, check it.
If you're going to be panning and/or tilting, make sure that you'll be comfortably
positioned throughout the whole move. You don't want to start a pan, then realise you
can't reach around far enough to get the end of it. If it's going to be difficult, you're better off finding the position which is most comfortable at the end of the move,
so that you start in the more awkward position and become more comfortable as you complete the move.
If the tripod head doesn't have a bowl (this includes most cheaper tripods), it's very
important to check that the framing still looks level as you pan - it may be okay in one
direction but become horribly slanted as you pan left and right.
If you're not using a tripod, stabilise yourself and your camera as best you can. Keep your arms and elbows close to your body (you can use your arms as "braces" against your torso). Breathe steadily. For static shots, place your feet at shoulder width (if you're standing), or try bracing yourself against some solid object (furniture, walls, or anything).
Frame your shot. Then do a quick mental check: white balance; focus; iris; framing (vertical and horizontal lines, background, etc.).
Think about your audio. Audio is just as important as vision, so don't forget about it.
Press "record". Once you're
recording, make sure that you are actually recording. There's no worse frustration than
realising that you were accidentally recording all the time you were setting the shot up,
then stopped recording when you thought you were starting.
Many cameras have a tape "roll-in time", which means that there is a delay
between the time you press record and when the camera begins recording. Do some tests and
find out what your camera's roll-in time is, so you can then compensate for it.
Keep checking the status displays in the viewfinder. Learn what all the indicators mean — they can give you valuable information.
Use both eyes. A valuable skill is the ability to use one eye to look through the viewfinder, and the other eye to watch your surroundings. It takes a while to get used to it, but it means that you can walk around while shooting without tripping over, as well as keeping an eye out for where the action is happening. It's also easier on your eyes during long shoots.
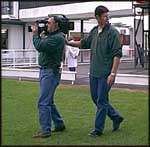
Learn to walk backwards. Have someone place their hand in the middle of your back and guide you. These shots can look great.
You'll often see television presenters walking and talking, as the camera operator walks backwards shooting them.
Keep thinking "Framing...Audio..." As long as you're recording, think about how the frame composition is changing, and what's happening to the sound.
Press "record stop" before moving. Just as in still photography, you should wait until one second after you've finished recording (or taken the photo) before you move. Too many home videos end every shot with a jerky movement as the operator hits the stop button.
That's all there is to it! Finally, here's a few more tips to finish off with...
Be diplomatic while shooting. Think about the people you're shooting. Remember that people are often uncomfortable about being filmed, so try to be discreet and unobtrusive (for example, you might want to position yourself some distance from the subjects and zoom in on them, rather than being "in their faces").
Many people find the red recording light on the camera intimidating, and freeze whenever they see it. Try covering the light with a piece of tape to alleviate this problem.
Learn to judge when it's worth making a nuisance of yourself for the sake of the shot, and when it's not. If it's an important shot, it might be necessary to inconvenience a few people to get it right. But if you're going to make enemies over something that doesn't matter, forget it and move on.
Use the "date/time stamp" feature sparingly. It's unnecessary to have the time and date displayed throughout your video, and it looks cheap. If you must have it there, bring it up for a few seconds, then get rid of it.
Modern digital cameras have the ability to show or hide this display at any time after recording.
Be prepared to experiment. Think about some of the things you'd like to try doing, then try them at a time that doesn't matter (i.e. don't experiment while shooting a wedding). Most new techniques take practice and experimentation to achieve success, and good camera work requires experience.
If you want to be good, you'll have to invest some time.
That's the end of this tutorial. If you're keen to continue, have a look at some of the more detailed camera tutorials. If you have any questions or comments, please post a message in our discussion forums.