Camera Functions

Most domestic camcorders can do just about everything automatically. All you have to do is turn them on, point, and press record. In most situations this is fine, but automatic functions have some serious limitations. If you want to improve your camera work, you must learn to take control of your camera. This means using manual functions. In fact, professional cameras have very few automatic functions, and professional camera operators would never normally use auto-focus or auto-iris.
This is where most beginners ask "Why not? My auto-focus works fine, and my pictures seem to look okay."
There are two answers:
- Although auto-functions usually perform well enough, there will be some situations they can't cope with (e.g. bad lighting conditions). In these circumstances you may be faced with unusable footage unless you can take manual control. More commonly, your shots will be useable but poor quality (e.g. going in and out of focus).
- Your camera can't know what you want. To get the best results or obtain a particular effect it is often necessary to over-ride auto-functions and go manual.
As you learn more about camera work you will begin to appreciate the better results gained through manual functions.
The most common camera operations are briefly explained below (they are covered in more detail in other tutorials). Starting at the beginning, learn and practice one at a time, leaving the others on auto-function.
Zoom
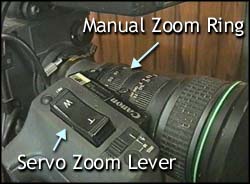
This is the function which moves your point of view closer to, or further away from, the subject. The effect is similar to moving the camera closer or further away.
Note that the further you zoom in, the more difficult it is to keep the picture steady. In some cases you can move the camera closer to the subject and then zoom out so you have basically the same framing. For long zooms you should use a tripod.
Zooming is the function everyone loves. It's easy and you can do lots with it, which is why it's so over-used. The most common advice we give on using the zoom is use it less. It works well in moderation but too much zooming is tiring for the audience.
For more information see Using the Camera Zoom.
Focus
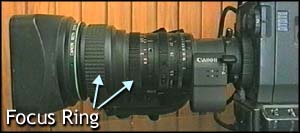
Auto-focus is strictly for amateurs. Unlike still photography, there is no way auto-focus can meet the needs of a serious video camera operator. Many people find manual focus difficult, but if you want to be any good at all, good focus control is essential.
Professional cameras usually have a manual focus ring at the front of the lens housing. Turn the ring clockwise for closer focus, anti-clockwise for more distant focus. Consumer cameras have different types of focus mechanisms — usually a small dial.
To obtain the best focus, zoom in as close as you can on the subject you wish to focus on, adjust the ring until the focus is sharp, then zoom out to the required framing.
For more information see the focus tutorial.
Iris
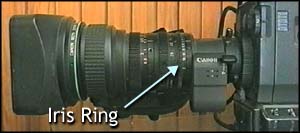
This is an adjustable opening (aperture), which controls the amount of light coming through the lens (i.e. the "exposure"). As you open the iris, more light comes in and the picture appears brighter.
Professional cameras have an iris ring on the lens housing, which you turn clockwise to close and anticlockwise to open. Consumer-level cameras usually use either a dial or a set of buttons.
The rule of thumb for iris control is: Set your exposure for the subject. Other parts of the picture can be too bright or darks, as long as the subject is easy to see.
For more information see the exposure tutorial.
White Balance
White balance means colour balance. It's a function which tells the camera what each colour should look like, by giving it a "true white" reference. If the camera knows what white looks like, then it will know what all other colours look like.
This function is normally done automatically by consumer-level cameras without the operator even being aware of it's existence. It actually works very well in most situations, but there will be some conditions that the auto-white won't like. In these situations the colours will seem wrong or unnatural.
To perform a white balance, point the camera at something matt (non-reflective) white in the same light as the subject, and frame it so that most or all of the picture is white. Set your focus and exposure, then press the "white balance" button (or throw the switch). There should be some indicator in the viewfinder which tells you when the white balance has completed. If it doesn't work, try adjusting the iris, changing filters, or finding something else white to balance on.
You should do white balances regularly, especially when lighting conditions change (e.g. moving between indoors and outdoors).
For more information see How to White Balance.
Audio
Virtually all consumer-level cameras come with built-in microphones, usually hi-fi stereo. These work fine, and are all you need for most general work.
Getting better results with audio is actually quite difficult and is a whole subject in itself. We won't go into it much here — you just need to be aware that audio is very important and shouldn't be overlooked.
If you're keen, try plugging an external microphone into the "mic input" socket of your camera (if it has one). There are two reasons why you might want to do this:
- You may have a mic which is more suited to the type of work you are doing than the camera's built-in mic. Often, the better mic will simply be mounted on top of the camera.
- You might need to have the mic in a different position to the camera. For example, when covering a speech, the camera could be at the back of the room with a long audio lead running to the stage, where you have a mic mounted on the pedestal.
The level at which your audio is recorded is important. Most cameras have an "auto-gain control", which adjusts the audio level automatically. Consumer-level cameras are usually set up like this, and it works well in most situations. If you have a manual audio level control, it's a good idea to learn how to use it (more on this later).
If possible, try to keep the background (ambient) noise level more or less consistent. This adds smoothness to the flow of the production. Of course, some shots will require sudden changes in ambient audio for effect.
Listen to what people are saying and build it into the video. Try not to start and finish shots while someone is talking — there's nothing worse than a video full of half-sentences.
Be very wary of background music while shooting — this can result is music that jumps every time the shot changes, like listening to a badly scratched record. If you can, turn the music right down or off.
One more thing... be careful of wind noise. Even the slightest breeze can ruin your audio. Many cameras have a "low-cut filter", sometimes referred to as a "wind-noise filter" or something similar. These do help, but a better solution is to block the wind. You can use a purpose-designed wind sock, or try making one yourself.
For more information about sound quality, see our audio tutorials.
Shutter
At the beginner level you don't really need to use the shutter, but it deserves a quick mention. It has various applications, most notably for sports or fast-action footage. The main advantage is that individual frames appear sharper (critical for slow-motion replays). The main disadvantage is that motion appears more jerky.
The shutter can also be used to help control exposure.
Unless you know how to use the shutter effectively, leave it off. For more information see the shutter tutorial.
Effects
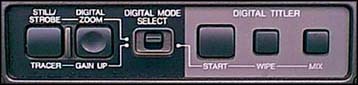
Many consumer cameras come with a selection of built-in digital effects, such as digital still, mix, strobe, etc. These can be very cool, or they can be very clumsy and tacky. They require dedicated experimentation to get right. Like so many things in video, moderation is the key: use them if you have a good reason to, but don't overdo it.
You should also be aware that almost every effect you can create with a camera can be done better with editing software. If at all possible, shoot your footage "dry" (without effects) and add effects later.
Remember: Although it is sometimes the more practical solution to use automatic features, as a general rule you should do as many camera operations manually as you can.
Next Page: Framing