Duplicating Actors with a Split-Screen
This technique is a fast and simple way to make a person appear twice in the same frame. It is suitable for scenes where the two versions of the actor are separated from each other. Each version of the actor must stay within their area of the frame, i.e. you can't have one walk in front of the other. (If you need a more advanced effect you will need to use keying.)
You will need editing software with some sort of split-screen capability. You can usually use a wipe transition or cropping tool to do this.
The idea is to shoot the same scene twice with the actor in different parts of the frame, then join them together like so (the checkered area represents transparency):

Step 1: Shooting
Place the camera on a tripod or stable mount. There must be no camera movement at all, and the background of the scene should be unchanging.
Use the camera's manual functions and keep the settings consistent — you don't want the auto-focus or auto-iris changing during the shot.
Record the first shot of the actor in one position, then record the second shot with the actor in the other position. If the actor needs to interact with his alter-ego, you need to practice and time the actions so they can be synchronised later.
Step 2: Compositing
Place the two clips in the timeline of your editing application, with one clip in a layer above the other.

In this example, the top layer contains the clip of the actor on the right (he enters the frame later), and the bottom clip is the actor on the left.
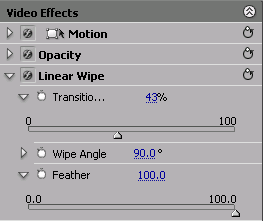
The next task is to remove the left half of the upper clip, so the left half of the lower clip becomes visible. Exactly how you do this will depend on your software and personal preference — for this tutorial we will use the Linear Wipe effect in Adobe Premiere (Effects > Transitions > Wipe). Most editing packages provide similar transition effects. You could also use a cropping tool or any other tool that allows you to make parts of the picture transparent.

Apply the wipe effect to the top clip. In the Effects Control palette, move the Transition Completion slider to about halfway across the frame, or until the desired part of the lower frame becomes visible. Set the Feather value fairly high to smooth the transition between the two halves.
You can also change the Wipe Angle if you don't want to have a vertical split.
Now that you can see both versions of the actor together, adjust the position of the two clips relative to each other to get the timing right (drag one of them left or right).
That's basically all there is to it — you're done!
Notes:
- You can add more duplicated actors by splitting the screen into three or more parts. Obviously the more splits you have, the more tricky it's going to get.
- The split-screen method is conceptually the same as the original technique used in early films. In the film technique, one half of the frame was hidden while the other was exposed, resulting in two shots each occupying half the frame.
For a more advanced alternative see the keying method.