Step 4: Add the Sparkles
Note: If you need to make your own sparkles clip, read these instructions first.
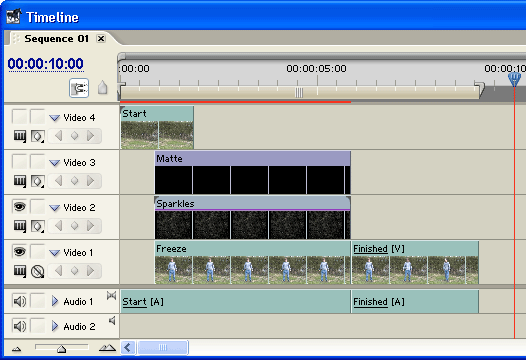
- Place the sparkles video clip in the Video 2 track above the Freeze clip. Rename it Sparkles.
- Import the the PSD file you created in the previous step, and place it in the Video 3 track above the Sparkles clip. Rename it Matte. Make the Video 3 Track invisible.
If necessary, adjust the duration of both new additions to match the duration of the Freeze clip.
Now you need to tell the Sparkles clip to use the Matte clip as a matte.
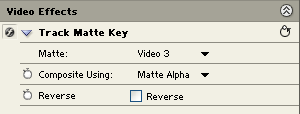
- In the Effects window select Video Effects > Keying > Track Matte Key. Drag this effect onto the Sparkles clip in the timeline.
- In the Effects Control window you will now see the Track Matte Options under Video Effects. Set the Matte to Video 3.
|
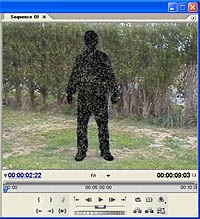
At this stage the Matte should be working. If you scrub through the Freeze clip you will see the subject has been replaced by an outline containing the moving sparkles. The next task is to gradually fade out this effect to reveal the subject. |
 |
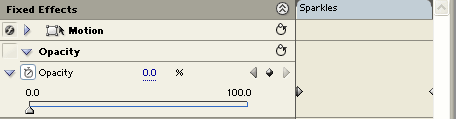
- In the timeline, place the current-time indicator at the start of the Sparkles clip and make sure the clip is selected.
- In the Effects Control window, create opacity keyframes at the start and end of the clip.
- Set the opacity of the end keyframe to 0%.
|
This creates a slow fade out from the start to the end of the clip (from 100% to 0% opacity). When you scroll through the Freeze clip you will see the sparkles slowly disappear and the subject comes into view. The middle and end of the materialization are now complete. The next step is to fade the whole effect in at the start. |
 |
- In the timeline, make the Video 4 track visible again and select the Start clip.
- In the Effects Control window, create three opacity keyframes: One at the start, one at the end, and one in the middle where the other clips begin.
- Set the opacity at the last keyframe to 0%.
If you show the opacity handles for these clips, the timeline should like like this:
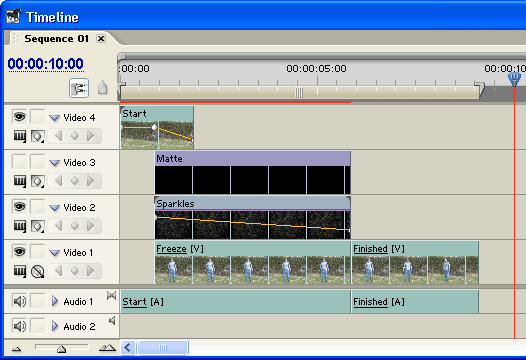
So now you have a timeline beginning with the Start clip, which fades out to reveal the sparkle effect, which in turn fades out to reveal the subject standing there. As soon as the effect has faded out the Finished clip begins with the actor moving.
Next Page: Audio