GIF Options
The main thing to understand about GIF files is that they are limited to 256 colours. Each individual colour can be any colour in the normal RGB range (i.e. you're not limited to a set palette of colours), but the total number of individual colours cannot exceed 256.
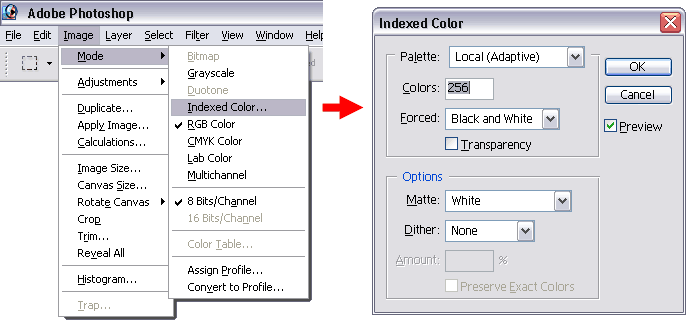
To save a file as a gif, you must therefore reduce the number of colours to 256 or less. In your menu, look for an option like "Image>Transform" or "Image>Mode". Then look for "Indexed Color" or "256-Color".
The Photoshop 7 menu is shown below. Select "Image>Mode>Indexed Color". This gives you the Indexed Color window with various options. Once you've changed the mode to 256-color, you can save the file as a GIF.
These examples are well-suited to the GIF format:  |
When to Use the GIF Format
The colour limitation is one reason GIFs aren't well suited to photos - photos generally require millions of individual colours for realistic quality. However GIFs do work well for files which have a lower number of colours, such as logos, icons, buttons, etc.
Small photo images are an an exception to this rule. These can work well as GIF, as the low number of total pixels means that not as many individual colours are required. The most common example is the "thumbnail" - a small version of an image which you click on to see the full version. Thumbnails can be either GIF or JPG, depending on which works best for you.
Remember: if you're not sure which format to use, save a different version in each format then compare image quality and file size.
Changing The Number of Colours
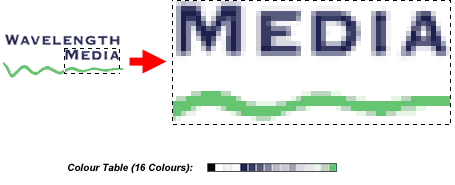
You will find that many GIFs don't need the full compliment of 256 colours. For example, the logo below has two main colours with a white background. As you zoom in you can see additional shades (these help smooth the transition between the sharp lines and the background), but the total number of colours in this image is only 16.
This is demonstrated in the file's "Colour Table". A colour table is essentially a list if every individual colour used in the file; that is, every pixel in the image is one of the colours in this table. The next section explains how to view a file's colour table.
Larger colour tables require larger file sizes, so in this case saving the file as a 256-colour GIF would create a larger size than necessary. Instead, when setting the indexed color mode, specify "16 Colors".
The rule of thumb is:
Always use the lowest number of colours you can get away with.
GIF Thumbnails
To create a thumbnail:
- Open your original image file (eg "mypic-original.jpg").
- Resize the image to somewhere between between 60 and 100 pixels width.
- Set the number of colours to between 64 and 256 and save as a separate GIF filed (eg "mypic-thumbnail.gif")
Note: To create the thumbnail hyperlink, you'll need to use HTML (see our Introduction to Web Design tutorial).
Optimising the Thumbnail

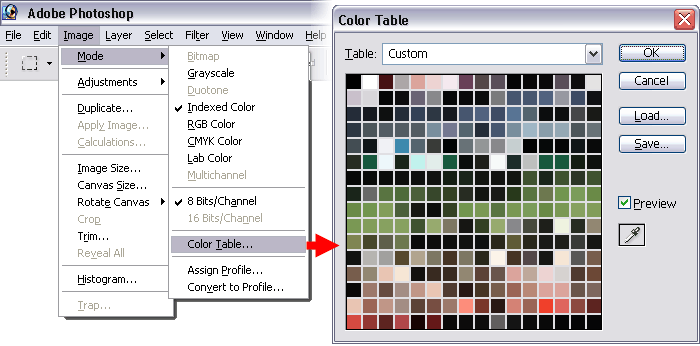
The thumbnail on the right is a 256-colour GIF, 80x60 pixels. To see its colour table in Photoshop 7, select "Image>Mode>Color Table...".
You'll notice that many of the colours are very similar. In this case we can afford to lose the finer shades and reduce the number of colours by 75%.
To do this, save the file as a GIF and select "64 Colours". This gives us the image below with its new colour table:

|
|
| 64-Colour GIF | Colour Table |
The change to the photo quality is minimal - most people wouldn't notice the drop in colour definition unless they zoomed in. However it has reduced the file size from 6KB to 4KB. That may not seem like much, but if you've got a web page photo gallery with dozens of thumbnails, a 33% reduction in file size and bandwidth is not to be sneezed at.
Animated GIFs
GIFs have one other interesting feature: They can be animated. A large number of the animations you see on the internet use this format.
Creating an animated GIF requires special software and is beyond the scope of this tutorial. Many graphics programs handle animated GIFs well (for example, see animated GIFs in Adobe Photoshop).
Corel Animation Shop 3
is an inexpensive GIF animation program which gives great results.
Note that you should be very careful working with animated GIFs - if you don't know what you're doing it's easy to destroy the animation.
Last Step: Summary