Graphics for the Internet
This beginner-level tutorial explains how to work with digital images for the internet, in particular:
- How to choose which file format to use for different purposes.
- How to get the most efficient file size for use with email, websites, etc.
The tutorial is seven pages and takes about 20 minutes to complete.
What You Need
We assume you have basic computer skills and are familiar with terms such as "hard drive", "file size", etc. If you're not, you need some computer tuition first.
We also assume you know how to save a digital image (such as a photo) on your computer. The two most common ways of doing this are:
- Using a scanner.
- Importing images from a digital camera.
If you don't know how to save an image, consult the manual or help file which came with your hardware/software.
You'll also need some graphics software. This can be anything from the simple MS Paint which comes with Windows to a serious application such as Adobe Photoshop. In many cases you will be using the program which came with your scanner or camera.
In this tutorial we use examples from Photoshop 7. Other programs may look and behave a bit differently but you should still get the idea. Predictably, you will have more options and better control if you have good software.
Contents of This Tutorial
We will cover the three most important things to understand about digital images:
- File Format: The type of file you save your image as (e.g. JPG, GIF, etc).
- File Size: The size of the image file (in bytes, KB, MB, etc).
- Image Quality: How your picture looks. Generally speaking better image quality requires a larger file size.

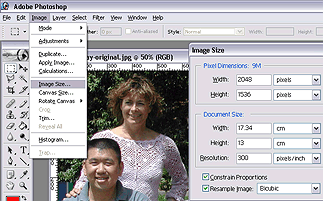
As we work through the tutorial we'll use the group photo shown here as a working example. This is an old photo, taken with a film camera and scanned at a fairly typical resolution.
At the end of the tutorial you will be able to:
- Create an image file to use as an email attachment.
- Create another version to use on a website.
- Create a small "thumbnail" image to use in a digital photo gallery.
Next Step: File Formats