Resizing an Image
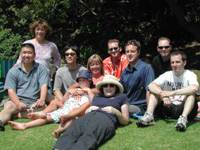 |
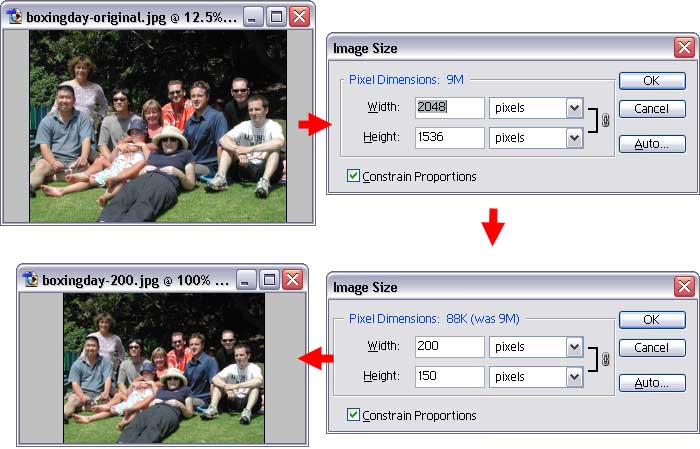
This image is 200x150 pixels.
The original scanned version was much larger - 2048x1536 pixels. Using Photoshop, the image was resized to approx 10% of the original.
First of all, let's clarify what we mean by image size. Digital images are made up of a huge number of individual dots called pixels (the word pixel is short for "picture element"). Every digital image is a rectangle* which can be measured in terms of pixel width and height. Digital cameras are often referred to in terms of their "megapixel" capability - this means how many million pixels are in a photo.
The situation is quite similar to the dots which make up a newspaper photo. This leads us to a common source of confusion: number of pixels versus DPI (dots per inch). Technically they measure the same thing. We won't go into the details here - it's enough to know that DPI tends to refer to printed images, whereas pixel numbers are more relevant to images displayed on a screen. For this tutorial we will work with pixel numbers.
There is one more thing to note: An image with a set number of pixels can still appear to be a different size on different computer monitors. This is because monitors themselves have their own resolution. Again, we won't go into the details but it's worth being aware of.
Zoom
Before you do anything you must understand how your viewing zoom level works. A common mistake is to view an image and think the size is fine, when in fact the image is much larger than it appears. This can happen when your viewing program automatically resizes the image to fit the available screen space. Look for a zoom option and make sure it is set to "100%" or "actual size". Only then will you see the image as it really is.
The Same Image at 12.5% and 100% Zoom.
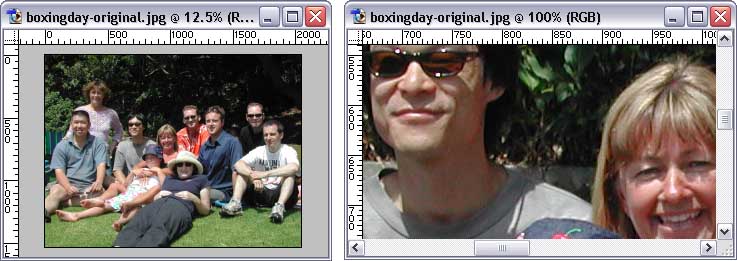
Above: At 12.5% zoom the entire picture fits in the viewing window. At 100% zoom (actual size), only a small part of the picture is visible at a time—you would need to use the scrollbars to see other parts of the picture.
What size does it need to be?
Exactly how big you want the image to be will depend on its intended use. For a web page, the image obviously needs to fit the space available. For stand-alone use (such as an email attachment you wish to share with friends) the image can be any size which comfortably fits the viewing screen. If you're not sure about the size, the following width guidelines may help:
- Web page photos are usually anywhere between 100px (large thumbnail size) and 800px (the full width of many monitors). An average photo might be 300px.
- Email attachments for casual viewing should normally be between 200px and 600px.
- Images which are intended for print should be as large as possible within any applicable file size constraints (eg the space available on your disk).

Changing the Image Size
The two most common ways to change an image's size are Crop and Resize. You may use either or both methods depending on the situation. If you use both methods on the same image, crop the image first and then resize it.
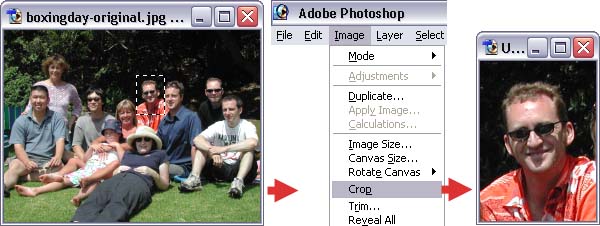
Before going any further it would be a good idea to locate these controls in your graphics program menu. In the Photoshop 7 menu (pictured), the controls can be found by selecting "Image>Image Size" and "Image>Crop". Other programs may have equivalent options called "Image Attributes", "Resize", etc.
Note: Some programs also have additional resizing options such as "Trim". These are more advanced options and you don't need to know about them at this stage
Crop the Image
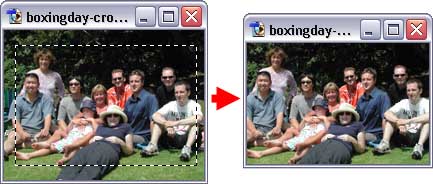
Using your rectangular selection tool, select the area of the image you wish to keep. Then select the crop option - simple as that! All parts of the image outside your selected area vanish and the image size shrinks accordingly.
Remember to keep an eye on your zoom and adjust it to fit your needs. In the example above the left image is at 12.5% zoom, the right image is 50%.
For web pages in particular you should be ruthless - lose any part of the image which isn't absolutely necessary. We can't afford to lose too much of our photo without cutting subjects out, but we can still make a modest file size reduction by cropping it like this:
Resize the Image
In your program menu, select the option to resize—a window should appear which allows you to enter width and height values for the image. Adjust these values and click "OK". You will probably need to make several attempts before getting the size exactly right (simply undo the resize and try again).
Notes:
- The image width and height can be different units such as inches, centimetres, pixels or percent. You can choose which unit to use—if the option is not shown in the same window, look in the program's Preferences menu.
- Most programs have an option to "constrain aspect ratio" (it may be called something else). This means that if you change the width or height, the other parameter will automatically adjust to keep the same relative width and height. This prevents the image from becoming distorted and you should normally have this option selected.
Footnote:
* All digital images are rectangles. When you see an image which appears to be an odd shape, the image file is still a rectangle—it's just that part of the image is either transparent or the same colour as the background.
Next Step: JPG Options