Preparation
Step 1: Preparation
 If
you are preparing the cable for a connector, I strongly suggest you
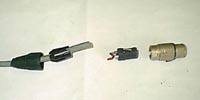
put any connector parts on now (the screw on part of an XLR, or casing
of a 1/4" jack for example). Get into the habit of sliding these
on before you start on the cable, or else you can bet it won't be
long before you finish soldering your connector only to discover you
forgot to put the connector casing on, and have to start all over
again.
If
you are preparing the cable for a connector, I strongly suggest you
put any connector parts on now (the screw on part of an XLR, or casing
of a 1/4" jack for example). Get into the habit of sliding these
on before you start on the cable, or else you can bet it won't be
long before you finish soldering your connector only to discover you
forgot to put the connector casing on, and have to start all over
again.
Once you have all the connector parts on that you need, you will need to strip your cable. This means removing the insulation from the end of the wire and exposing the copper core. You can either use a wire stripper, side cutters, or a knife to do this.
 The
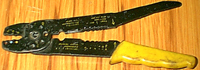
obvious tool to choose to strip a wire would be......a wire stripper.
There are many types of wire stripper, and most of them work the same.
You simply put the wire in, and squeeze it and pull the end bit off.
It will cut to a preset depth, and if you have chosen the right depth
it will cut the insulation off perfectly. It is possible to
choose the wrong depth and cut too deeply, or too shallow, but they
are very easy to use.
The
obvious tool to choose to strip a wire would be......a wire stripper.
There are many types of wire stripper, and most of them work the same.
You simply put the wire in, and squeeze it and pull the end bit off.
It will cut to a preset depth, and if you have chosen the right depth
it will cut the insulation off perfectly. It is possible to
choose the wrong depth and cut too deeply, or too shallow, but they
are very easy to use.
On the other hand, some people (myself included) prefer to use a knife or side cutters. I use side cutters for small cable and a Stanley knife for bigger cables...and although I have a couple of wire strippers, I haven't used them for years. This may seem odd, but I've got my side cutters and knife with me anyway, and they do the job fine.
 If
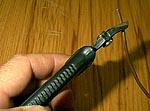
you are using side cutters (as shown here), position them about 10mm
(1/2 inch) from the end, and gently squeeze the cutters into the insulation
to pierce it, but not far enough to cut the copper strands of the
core. Open the cutters slightly so you can turn the wire and pierce
the rest of the insulation. You may have to do this a few times to
cut through all of the insulation, but it is better to cut too shallow
and have to turn and cut again rather than cut the core and have to
start again. Now you should be able to slide the insulation off with
your cutters, or pull it off with your fingers. This may sound a tedious
method, but in no time at all you will be able to do it in two cuts
and a flick of the cutters.
If
you are using side cutters (as shown here), position them about 10mm
(1/2 inch) from the end, and gently squeeze the cutters into the insulation
to pierce it, but not far enough to cut the copper strands of the
core. Open the cutters slightly so you can turn the wire and pierce
the rest of the insulation. You may have to do this a few times to
cut through all of the insulation, but it is better to cut too shallow
and have to turn and cut again rather than cut the core and have to
start again. Now you should be able to slide the insulation off with
your cutters, or pull it off with your fingers. This may sound a tedious
method, but in no time at all you will be able to do it in two cuts
and a flick of the cutters.
I won't explain how I use a knife to do larger cable, as I'd hate someone to slice a finger or thumb open following my instructions. Using a sharp blade like that certainly does have it's risks, so stick with wire cutters or side cutters if you are at all unsure.
 If
your connector has been used before, make sure you remove any remnants
of wire and solder from the contacts. Do this by putting the tip of
your soldering iron into the hole and flicking the solder out when
it has melted. Common Sense Alert! Please be careful when you
flick melted solder...flick it away from you.
If
your connector has been used before, make sure you remove any remnants
of wire and solder from the contacts. Do this by putting the tip of
your soldering iron into the hole and flicking the solder out when
it has melted. Common Sense Alert! Please be careful when you
flick melted solder...flick it away from you.
Next Page: Tinning