Tinning
Step 2: Tinning
 Whatever
it is you are soldering, you should 'tin' both contacts before you
attempt to solder them. This coats or fills the wires or connector
contacts with solder so you can easily melt them together.
Whatever
it is you are soldering, you should 'tin' both contacts before you
attempt to solder them. This coats or fills the wires or connector
contacts with solder so you can easily melt them together.
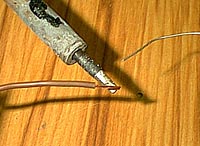
To tin a wire, apply the tip of your iron to the wire for a second or two, then apply the solder to the wire. The solder should flow freely onto the wire and coat it (if it's stranded wire the solder should flow into it, and fill the wire). You may need to snip the end off afterwards, particularly if you have put a little too much solder on and it has formed a little ball at the end of the wire.
 Be
careful not to overheat the wire, as the insulation will start to
melt. On cheaper cable the insulation can 'shrink back' if heated
too much, and expose more copper core that you intended. You can cut
the wire back after you have tinned it, but it's best simply not to
over heat it.
Be
careful not to overheat the wire, as the insulation will start to
melt. On cheaper cable the insulation can 'shrink back' if heated
too much, and expose more copper core that you intended. You can cut
the wire back after you have tinned it, but it's best simply not to
over heat it.
The larger the copper core, the longer it will take to heat up enough to draw the solder in, so use a higher temperature soldering iron for larger cables if you can.
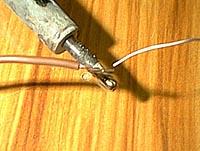
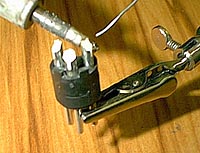 To
tin a contact on an audio XLR connector, hold the iron on the outside
of the the contact for a second or two, then apply the solder into
the cavity of the contact. Once again, the solder should flow freely
and fill the contact. Connectors such as jacks have contacts that
are just holes in a flat part of the connector. To tin these you put
your iron on it, and apply the solder to where the iron is touching.
The solder should flow and cover the hole.
To
tin a contact on an audio XLR connector, hold the iron on the outside
of the the contact for a second or two, then apply the solder into
the cavity of the contact. Once again, the solder should flow freely
and fill the contact. Connectors such as jacks have contacts that
are just holes in a flat part of the connector. To tin these you put
your iron on it, and apply the solder to where the iron is touching.
The solder should flow and cover the hole.
Once you have tinned both parts, you are ready to solder them together.
Next Page: Soldering